
In the new era of enormous internet services development, we are hearing the “microservice” term too many times. Unlike monolith applications, we are creating lots of individual maintainable and testable mini-applications that empower us to create a scalable service. This new era brought with it new needs – infrastructure as a code and container orchestration are two big ones. I don’t want to explain these words but we are going to get down to business and create a simple example to get some real ideas about them.
I always wanted to find an easy, independent, and low-cost solution to have my own container orchestration that empowers me to test lots of cloud technologies like Prometheus, Fluentd, Traefik. Also, I was thinking I should do this with a standard approach in order to make that knowledge useful for my career path which in this case is infrastructure as code.
In this tutorial, we are going to build our own one-node low-cost Kubernetes cluster from scratch. If you don’t have any knowledge about any of the components – don’t worry, I am trying to create a step-by-step brief guide that provides you with some basic ideas. We will not dive into details but we will create the big picture as fast as possible, and after having something meaningful we can continue to play and learn more. After all, it is just a lab to experience some popular technologies and is not supposed to be used in a real production situation.
Step 1: Provision of a server with the help of Terraform
To create a new server we are going to use Terraform, Terraform is an open-source infrastructure as a code software tool created by HashiCorp. Users define and provision data center infrastructure using a declarative configuration language. To use the terraform command I prefer to install tfswitch which empowers me to switch between different versions of terraform. If you want to install terraform directly, please install version 0.13.
Terraform uses Providers to communicate with services like AWS, Cloudflare, and we are going to use Hetzner Cloud Provider because they are providing a decent and simple service with a really low price that suits our goal. Let’s start our journey: in an empty folder, we should create four files:
versions.tf
| terraform { required_providers { hcloud = { source = “hetznercloud/hcloud” } } required_version = “>= 0.13” } |
variables.tf
| variable “hcloud_token” {}
variable “private_ssh_key_path” { default = “~/.ssh/id_rsa” } |
main.tf
| # Configure the Hetzner Cloud Provider provider “hcloud” { token = var.hcloud_token }
# Add main ssh key resource “hcloud_ssh_key” “default” { name = “main ssh key” public_key = file(“${var.private_ssh_key_path}.pub”) }
# Create a server resource “hcloud_server” “node1” { name = “node1” image = “ubuntu-16.04” ssh_keys = [hcloud_ssh_key.default.name] server_type = “cx11” } |
outputs.tf
| output “public_ip4” { value = “${hcloud_server.node1.ipv4_address}” }
output “status” { value = “${hcloud_server.node1.status}” } |
You may wonder what are these files, don’t worry, the main.tf will add a ssh key and also a server in the hetzner Cloud. You might wonder, how do I find out about them? by checking the provider documentation: https://registry.terraform.io/providers/hetznercloud/hcloud/latest/docs/resources/server
Now it is time for initializing the terraform provider and checking the correct format of the files, we can do that by the below commands inside of our folder:
CLI
| tfswitch
terraform init
terraform fmt |
If you didn’t see any problem it means you are ready to move to the next step, but if you’d like to learn more about terraform, please read this: https://kubernetes.io/docs/tutorials/
Step 2: Configuring the platform
Now we are ready to provision our server via code, in order to make that happen we should get help from a cloud service provider – in our case, Hetzner cloud. The benefit of Hetzner is that it avoids lots of complexity that may confuse us at the beginning. Alongside providing a fair quality, the monthly price of their servers could be as cheap as a Doener kebab!
Please go to https://www.hetzner.com/cloud to sign up and verify your account, and then create a new project. Go to your new project -> Security tab -> API Tokens and generate a new one with Read & Write permission level:
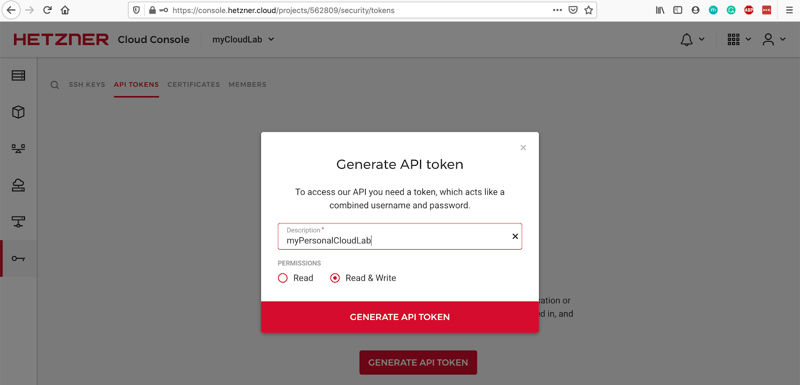
Copy the generated token and put it into a new file in your folder like this:
terraform.tfvars
| hcloud_token = “yourHetznerToken” |
It is better to generate a dedicated ssh key for our lab without any passphrase, we can generate that by:
CLI
| ssh-keygen -f ~/.ssh/myPersonalCloudLab |
Let’s define it to our terraform.tfvars file like this:
terraform.tfvars
| hcloud_token = “yourHetznerToken” private_ssh_key_path=”~/.ssh/myPersonalCloudLab” |
Now you are ready to create your very first server, please run:
CLI
| terraform plan |
Here you can see an execution plan that will add two items, an ssh key, and a server. Remember you can always see more detail about arguments by a command like this:
CLI
| terraform plan –help |
and now it’s time to make your dreams real, and create them on the Hetzner:
CLI
| terraform apply |
Wonderful, we’ve created our first server with the help of terraform. It’s time to move to the third and last section of this article, but in case you are wondering what else you can put in your server configuration values – you can check out the examples below and play with them:
CLI
| brew install jq export API_TOKEN=yourHetznerToken # https://docs.hetzner.cloud/#images
curl \ -H “Authorization: Bearer $API_TOKEN” \ ‘https://api.hetzner.cloud/v1/images’ | jq “.images[].name” # https://docs.hetzner.cloud/#server-types-get-all-server-types
curl \ -H “Authorization: Bearer $API_TOKEN” \ ‘https://api.hetzner.cloud/v1/server_types’ | jq “.server_types[] | .name, .prices” | less |
Step 3: Installing Kubernetes on our server
Nowadays the most popular container orchestration tool is Kubernetes, which was developed originally at Google. To learn it, the usual suggestion is to use a local program name minikube. However, it is not designed for running on servers. instead, we are going to use k3s project. K3s is a widely available, certified Kubernetes distribution, designed for production workloads in unattended, resource-constrained, remote locations or inside IoT appliances.
Remember that we are using Terraform to manage our infrastructure, which is good for provisioning. However, regarding configuration management, the usual suggestion would be to use something like Ansible alongside Terraform. Luckily the installation process of k3s is very simple and we can manage it easily via Terraform itself. For this purpose, please change node1 in the main.tf like this::
main.tf
| # Configure the Hetzner Cloud Provider provider “hcloud” { token = var.hcloud_token }
# Add main ssh key resource “hcloud_ssh_key” “default” { name = “main ssh key” public_key = file(“${var.private_ssh_key_path}.pub”) }
# Create a server resource “hcloud_server” “node1” { name = “node1” image = “ubuntu-16.04” ssh_keys = [hcloud_ssh_key.default.name] server_type = “cx11”
connection { type = “ssh” user = “root” private_key = file(var.private_ssh_key_path) host = self.ipv4_address agent = “true” }
provisioner “remote-exec” { inline = [ “curl -sfL https://get.k3s.io | sh -“, ] }
} |
As you can see we’ve added two new sections – connection and remote-exec. The idea is to automatically connect to our server and install k3s on that, provisioner and connection blocks are considered only during the “create” action, therefore we have to destroy our server and rebuild it:
CLI
| terraform destroy terraform apply |
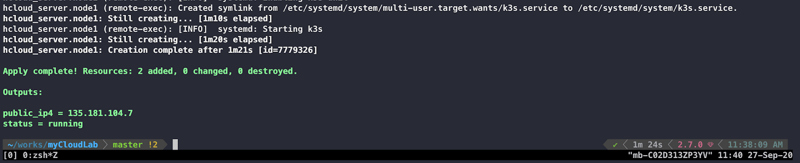
Nice, it seems like we are almost done! We have k3s on our server. To work with our Kubernetes cluster, we should use the kubectl command. You can follow this official documentation to install that command on your os. After installing it, we should download our k3s config file and change the server ip address:
CLI
| scp -i ~/.ssh/myPersonalCloudLab root@yourServerIP:/etc/rancher/k3s/k3s.yaml . sed -i.backUp ‘s,127.0.0.1,yourServerIP,g’ k3s.yaml export KUBECONFIG=$PWD/k3s.yaml |
Now you should be able to see one node via kubectl command:
CLI
| kubectl get node |
Congratulations, we have our Kubernetes and we can be proud that we created it via terraform. We learned a lot and it is time to learn more by playing with Kubernetes commands. If you’d like to deploy a weblog system on your Kubernetes, you can look at my GitHub repository where I’ve already created the whole chain of having WordPress on k3s: https://github.com/pesarkhobeee/wp-k3s
I hope this article is a useful first step to getting familiar with Infrastructure as code and container orchestration concepts. ^_^
resources:
- https://learn.hashicorp.com/tutorials/terraform/infrastructure-as-code
- https://registry.terraform.io/providers/hetznercloud/hcloud/latest/docs
- https://registry.terraform.io/providers/hetznercloud/hcloud/latest/docs/resources/server
- https://docs.hetzner.cloud/
- https://rancher.com/docs/
Author

This article was written by Farid Ahmadian, a DevOps/Systems Engineer at Bonial.